Showing posts with label Ruby on Rails. Show all posts

Friday, 24 January 2014

Time Zone in Rails

There’s pretty good info out there about using time zones in Rails, and Rails itself does a lot of the heavy lifting. The Railscast pretty much covers it. It’s only missing a discussion of using Javascript to figure out the client browser’s time zone.

Time Zone from the Browser

To get the time zone from the browser, use the detect_timezone_rails gem. The instructions give you what you need to know to set up a form with an input field that will return the time zone that the browser figured out. That would work perfectly if you were implementing a traditional web site sign-up/sign-in form.
However, I needed to do something different. Since I’m using third party identity providers (Google, Twitter, Facebook, etc.) via the excellent Omniauth gems, I needed to be able to put the time zone as a parameter on the URL of the identity provider’s authorization request. Omniauth arranges for that parameter to come back from the identity provider, so it’s available to my app’s controller when I set up the session.
To add the parameter, I added this jQuery script to the head of the welcome page:
<script type="text/javascript">
  $(document).ready(function(){
        $('a.time_zone')
          .each(function() {
            this.href = this.href + "?time_zone=" +
              encodeURIComponent($().get_timezone());
      });
  });
</script>
This added the time zone, appropriately escaped, to the URL for the identity provider (the href of the <a> elements). This worked because I had set each of the links to the identity providers to have class="time_zone", like this:
<div class="idp">
  <%= link_to image_tag("sign-in-with-twitter-link.png", alt: "Twitter"), 
    "/auth/twitter", 
    class: "time_zone" %></div>
In the controller, I did this (along with all the other logging in stuff):
if env["omniauth.params"] &&
  env["omniauth.params"]["time_zone"]
  tz = Rack::Utils.unescape(env["omniauth.params"]["time_zone"])
  if user.time_zone.blank? 
    user.time_zone = tz
    user.save!
    flash.notice = "Your time zone has been set to #{user.time_zone}." +
      " If this is wrong," +
      " please click #{view_context.link_to('here', edit_user_path(user))}" +
      " to change your profile."
  elsif user.time_zone != tz
    flash.notice = "It appears you are now in the #{tz} time zone. " +
      "Please click #{view_context.link_to(edit_user_path(user), 'here')}" +
      " if you want to change your time zone."
  end
else
  logger.error("#{user.name} (id: #{user.id}) logged in with no time zone from browser.")
end      
Of course, you may want to do something different in your controller.

Testing Time Zones

However you get your time zones, you need to be testing your app to see how it works with different time zones. YAML, at least for a Rails fixture, interprets something that looks like a date or time as UTC. So by default, that’s what you’re testing with. But that might not be the best thing.
I had read that a good trick for testing is to pick a time zone that isn’t the one your computer is in. Finding such a time zone might be hard if you have contributors around the world. I like the Samoa time zone for testing: Far away from UTC, not too many people living in the time zone, and it has DST.
If you want a particular time zone in your fixtures, you have to use ERB. For example, in my fixtures I might put this:
created_at: <%= Time.find_zone('Samoa').parse('2014-01-30T12:59:43.1') %>
And in the test files, something like this:
test "routines layout" do
  Time.zone = 'Samoa'
  correct_hash = {
    routines(:routine_index_one)=> {
      Time.zone.local(2014, 01, 30)=> [
        completed_routines(:routine_index_one_one)
      ],
      ...

Gotchas

I found a few gotchas that I hadn’t seen mentioned elsewhere:
  • Rails applies the time zone magic when it queries the database, so if you change your time zone after you retrieve the data, then you have to force a requery, or the cached times will still be in the model. Shouldn’t be a problem when running tests, but is when using the console to figure things out
  • You can’t use database functions to turn times into dates, as these won’t use the time zone. No group by to_date(...) or anything like that

Tuesday, 7 January 2014

Self-Referential, Polymorphic, STI, Decorated, Many-to-Many Relationship in Rails 4

Preamble

I wanted to model connections à la connections in LinkedIn or Facebook in a Rails application. This means a many-to-many association between instances of the same class. That caused me some grief trying to get it hooked up right because you can’t rely on Rails to figure everything out.
The other trick in my application is that the people involved in the connections might be users who have registered to use the application, or they might be people created by a registered user, but who aren’t registered to user the application.
Concretely, and hopefully more clearly, I have “users”, who have registered, and I have people who can be involved connections. In my app the people who aren’t registered users are “patients”.
In the course of trying to get this all to work I stumbled across three approaches to this type of problem:
  1. Polymorphic classes
  2. Single Table Inheritance (STI)
  3. Decorator pattern
The combination of the many-to-many combined with the two classes took a lot of work to get straight. The Rails Guides were a great starting point, but I find that specifying Rails associations can be tricky if it’s not completely straightforward, and especially when you start chaining them together.
In the end, I decided to go with the Decorator pattern. But I’ll start with the one I threw out first: Polymorphic.

Polymorphic

I got pretty far with polymorphic associations, but I couldn’t figure out how I was going to get a list of all people (patients and users) connected to another person. I could either get all patients or all users from the methods that the Rails associations gave me, but not a list of all together.
I realized in writing the preamble above that I probably should have realized that what I was trying to model wasn’t really a polymorphic situation. Polymorphic in the examples I saw was used to connect an object to another object from any one of a number of unrelated classes. Of course, hindsight is 20/20.
This post convinced me that trying to get a list of all people wasn’t going to come naturally from a polymorphic approach, so I stopped pursuing it.

Single Table Inheritance

I got fired up about single table inheritance (STI) as I was reading about how to make the polymorphic approach work. A good brief write up is here: http://blog.thirst.co/post/14885390861/rails-single-table-inheritance. The Railscast is here: http://railscasts.com/episodes/394-sti-and-polymorphic-associations (sorry, it’s a pro Railscast so it’s behind a paywall).
Others say I shouldn’t do STI. People say it can cause problems. One problem is if the type of an object will change, and change because of user input, it’s hard to handle. The view and controller are fixed to a certain object, so you can’t change the object type based on user input.
So here’s the code. First, create the models:
rails g model person name:string type:string provider:string uid:string
rails g model link person_a:references person_b:references b_is:string
person.rb
class Person < ActiveRecord::Base
  has_many :links, foreign_key: "person_a_id"
  has_many :people, :through => :links, :source => :person_b
  scope :patients, -> { where(type: "Patient") }
  scope :users, -> { where(type: "User") }
end
user.rb (obviously there will be functionality here, but this is what I needed to get the associations to work):
class User < Person
end
patient.rb (as with user.rb, functionality will come later):
class Patient < Person
end
link.rb
class Link < ActiveRecord::Base
  belongs_to :person_a, class_name: "Person"
  belongs_to :person_b, class_name: "Person"
end
It was a little hard to get the associations to work. The key to making the has_many :links,... in person.rb work was the , class_name: "Person" on the association in link.rb.
With the above, I can do things like:
person = Person.find(1).first
person.people.first.name
person.people.patients.first.name
person.people.users.first.name
That’s all pretty sweet, and I really considered using this approach. In fact, I may return to it. There’s a lot left to do with my application. However, I’m pretty sure that I will need to deal with cases like a registered user corresponding to multiple patients (e.g. people get created under different names). Eventually I need a way to consolidate them.

Decorator

In the end, perhaps the simplest was the best. I just decorated a person with an instance of a user when the person is a registered user. (This allows multiple people for a user, which might be useful for consolidating duplicate people.)
Here’s what I did:
Generate the models:
rails g model link person_a:references person_b:references b_is:string
rails g model person user:references name:string
rails g model user uid:string name:string provider:string
person.rb
require 'person_helper'

class Person < ActiveRecord::Base
  belongs_to :user
  has_many :links, foreign_key: :person_a_id
  has_many :people, through: :links, source: :person_b

  include PersonHelper
end
I thought the person model should have has_one instead of belongs_to, but that would put the foreign key in the wrong model.
user.rb
require 'person_helper'

class User < ActiveRecord::Base
  has_many :identities, class_name: "Person"
  has_many :links, through: :identities
  has_many :people, through: :links, :source => :person_b

  include PersonHelper
end
lib/person_helper.rb
module PersonHelper
  def users
    people.select { |person| ! person.user_id.nil? }
  end

  def patients
    people.select { |person| person.user_id.nil? }
  end
end
link.rb
class Link < ActiveRecord::Base
  belongs_to :person_a, class_name: "Person"
  belongs_to :person_b, class_name: "Person"
end
With the above, I can do things like:
person = Person.find(1).first
person.people.first.name
person.patients.first.name
person.users.first.name
user = User.find(2).first
user.users.first.name
Again, sweet. Same number of files at the STI version. Instead of subclassing, common functionality is handled by a mixin module.

Postscript

Another thing people don’t seem to like about STI is that it’s easy to end up with a big table full of all sorts of columns used only in a few places. Most modern database management systems aren’t going to waste a significant amount of space for unused columns, so I’m not sure what the problem is.
However, it got me thinking if there isn’t a way in Rails to have more than one table under a model. Or more to the point, could you have a table for the base model class, and a different table for each of the subclasses, and have Rails manage all the saving a retrieving.
I’m sure I’m not the first person to think of this. But I’m not going to go looking for it right now.

Other Resources

Rails 4 guides on associations: http://guides.rubyonrails.org/association_basics.html and migrations: http://guides.rubyonrails.org/migrations.html.
Ryan Bates’ Railscast on self-referential associations: http://railscasts.com/episodes/163-self-referential-association, and on polymorphic associations: http://railscasts.com/episodes/154-polymorphic-association.

Thursday, 2 January 2014

Moving to rbenv and Installing Rails on LInux Mint 13

I'm back to doing a bit of Rails. As always, the world has moved on. Rails is at 4.0.2, and Ruby 2.0 is out. The Rails folks are recommending rbenv to manage different Ruby versions and their gems. I knew I still had some learning to do to be using rvm properly, so I decided to invest the learning time in learning rbenv, since that's what the mainstream was using.

First, I had to remove the lines at the end of my ~/.bashrc, ~/.profile, and ~/.bash_profile, and restart all my terminal windows.

I followed the rbenv installation instructions here: https://github.com/sstephenson/rbenv#installation, including the optional ruby-build installation.

Then, I did:

rbenv install -l

that shows 2.0.0-p353 as the newest production version of MRI. So I did:

rbenv install 2.0.0-p353
rbenv rehash # Either this or the next was necessary to avoid trying to install Rails in the system gem directories.
rbenv global 2.0.0-p353
gem install rails
rbenv rehash # Don't forget this again

Now I was ready to test a new application:

rails new example
cd example
rails server

Then I pointed a browser to: http://localhost:3000, and voilà.

I'm not sure I want to leave the rbenv global in place...

Sunday, 16 September 2012

Installing Ruby on Rails on Linux Mint 13

A few months after my last post about installing Ruby on Rails, and much has changed. There was an issue with zlib so I had to flail around a bit. The following instructions are what I think I should have done:
  1. Run "sudo apt-get install zlib1g zlib1g-dev" in a terminal window
  2. Install the Ruby Version Manager (rvm) from these instructions
  3. Run "rvm requirements" in a terminal window
  4. Install all the packages the output of "rvm requirements" tells you to install (apt-get install...). You must do this before you start installing any rubies with rvm. If you don't, you may have all sorts of problems crop up later, like weird messages from irb ("Readline was unable to be required, if you need completion or history install readline then reinstall the ruby.")
  5. Do the following in a terminal window:
rvm install 1.9.3-p194
rvm --default 1.9.3-p194
gem install rails 
sudo apt-get install sqlite 
sudo apt-get install libsqlite3-dev libmysqlclient-dev
sudo apt-get install nodejs 

Now create an application to test:

rails new testapp 
cd testapp 
rails server 

Browse to localhost:3000 and you should see the Rails default page.

Friday, 27 January 2012

Installing Ruby on Rails on Ubuntu 11.10

[I've made an important change to this post -- steps 3 and 4 below are new. Apologies to anyone I've lead astray.]

I'm back to playing with Rails a bit. NetBeans for Ruby is gone, so I'm going to do things the macho Rails way and just develop with an editor and a bunch of terminal windows. (One of my open source rules is "do whatever everyone else is doing." Trying to use an IDE with Rails was always a violation of that rule.)

rvm
 is a great idea. I found it really helpful to read about named gemsets early on. I had to install rvm, then install rails and a few other packages.
  1. Install the Ruby Version Manager (rvm) from these instructions
  2. Put this line at the end of your .bashrc: "[[ -s "$HOME/.rvm/scripts/rvm" ]] && . "$HOME/.rvm/scripts/rvm" # Load RVM function"
  3. Run "rvm requirements" in a terminal window
  4. Install all the packages the output of "rvm requirements" tells you to install (apt-get install...). You must do this before you start installing any rubies with rvm. If you don't, you may have all sorts of problems crop up later, like weird messages from irb ("Readline was unable to be required, if you need completion or history install readline then reinstall the ruby.")
  5. Do the following in a terminal window:
rvm 1.9.3 
rvm --default 1.9.3 
gem install rails 
sudo apt-get install sqlite 
sudo apt-get install libsqlite3-dev 
sudo apt-get install nodejs 

Now create an application to test:

rails new testapp 
cd testapp 
rails server 

Browse to localhost:3000 and you should see the Rails default page.


Thursday, 9 April 2009

Time Comparison in Ruby, especially on Rails

I had a bizarre failure in some test cases. The test case looked like this:
marker = Time.now
t.create(args)
assert t.created_at.between?(marker, Time.now)
In other words, take the time, create an object, and make sure it was created between the first time and now. Obviously true, but my test was failing.

The reason: Rails keeps the create time to the second, but Ruby keeps time to fractions of a second (depending on the resolution of your hardware clock). Both would have the same time (to the second) but the marker would have some microseconds more than t.created_at, so the assertion would fail.

The Ruby documentation actually warns you about this, but in way that's cryptic enough that it might not be obvious why your simple test case is failing in such a bizarre way.

The solution? Mine was make the time an integer and convert it back to a time using Time.at:
marker = Time.at(Time.now.to_i)
t.create(args)
assert t.created_at.between?(marker, Time.now)
This doesn't really merit a blog post, except that I Googled for solutions to the problem and didn't find much.

Sunday, 22 March 2009

Solr and Rails

Well, after some long diversions I have Solr working in some simple test cases with Rails. The long diversion was partly caused by not understanding what was offered by the Rails Solr plug-in, so I'm going to give an overview here, and a link to detailed instructions for Solr in Rails at the end of this post.

The Rails plug-in for Solr from git://github.com/mattmatt/acts_as_solr.git includes a complete installation of Solr. You don't need to install Solr separately. (My "long diversion" is that I rushed off and installed Solr separately, and spent a fair bit of time getting it running due to my ignorance of how it worked.)

If you want to index Word, Excel, PDF, and other types of documents, there is a bit of additional configuration to do. To index those files types you have to get a nightly build of Solr from here, and copy some files and directories as described in the link at the end of this post. You have to add the following lines to example/solr/conf/solrconf.xml:
  <requestHandler name="/update/extract" class="org.apache.solr.handler.extraction.ExtractingRequestHandler">
<lst name="defaults">
<str name="ext.map.Last-Modified">last_modified</str>
<bool name="ext.ignore.und.fl">true</bool>
</lst>
</requestHandler>
The plug-in also includes rake tasks to start and stop instances of the Solr server for development, test and production -- very handy. Just type
rake solr:start RAILS_ENV=test 
to start the test Solr server (default environment is development). It also gives you a yaml file in your environment directory to configure the ports that each instance of Solr will use (as installed: production on 8983, test on 8981 and development on 8982).

One thing I learned on my diversion is that Solr comes with an administration user interface that shows how many documents are in the Solr database, and lets you try ad-hoc queries. It's a good way to test if Solr is actually running. For example, after running the rake task to start Solr for development, you can browse to localhost:8982/solr/admin and you should get the Solr administration page.

So that's the overview. The detailed write up is here. It's good. I just wish I had this overview first so I knew what I was getting and where I was going.

Thursday, 12 March 2009

NetBeans, Gems, Rails, and Permissions

I've gone from being a shell/make/rcs guy to quite liking IDEs, or at least useful IDEs. I find NetBeans to be a pretty nice, light-weight (in the good sense) IDE, but it has some issues on Ubuntu and other properly secured OSs. Here's how I've got it to work. This applies to NetBeans 6.1 and 6.5, I believe.

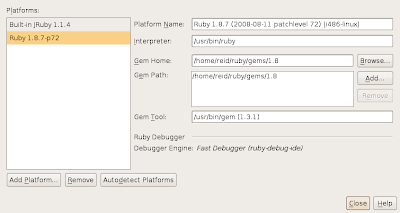
First, you have to set up your Ruby platforms so they keep their gems in writable directories. Go to Tools-> Ruby Platforms. On NetBeans 6.5 (at least), the jRuby gems are in a writable, per user path by default. If you click on the "Autodetect Platforms" button and get the native Ruby platform, change the "Gem Home:" and "Gem Path:" directories to somewhere writable, like /home/reid/ruby/gems/1.8.

While you're here, make sure the version of /usr/bin/gem is 1.3.1 or higher. If it isn't, I think you have to upgrade from a shell. I did that upgrade a while ago, so I don't remember how to do it, but you can find out easily through Google. (Ubuntu users may want to look here.)

It should all look like this:

Now go re-install all the gems you need through Tools-> Ruby Gems.

At this point, you still may not be able to install plugins. You'll get the following message: "Missing the Rails 2.2.2 gem" (or whatever version NetBeans installed for you). Rake from within NetBeans seems to look at the system rails executable, and not the one installed through the NetBeans' own gem installer. But the environment.rb generated for a new application does use the version of Rails installed by NetBeans. What I did (yuck, because there's some redundancy here) is manually install the appropriate Rails version:
sudo gem install rails
I'm sure there's a better way, but I can't think of it right now and I really want to write some Rails code instead of fighting with NetBeans.

Wednesday, 15 October 2008

Netbeans Rake Menu Missing

In NetBeans 6.1, I created a new project and the "Run Rake Tasks" menu was empty (it only said "Refresh List"). I found someone else through Google who had the same problem, but no solution other than "use NetBeans 6.5 beta".

After fooling around a bit, I simply un-installed Rails 2.1.1 and re-installed it and voila, the "Run Rake Tasks" menu was populated with all its tasks. Bizarre.

P.S. It wasn't completely random that I chose to re-install Rails 2.1.1. When I tried to check on the plug-ins I had installed, I got a message that said to install Rails 2.1.1. My gems list said it was already installed, so I decided to un-install it and then install.

Thursday, 24 April 2008

NetBeans Out of Memory Updating Ruby Gems

I got a message "Exception in thread "main" java.lang.OutOfMemoryError: Java heap space" while updating Ruby Gems in NetBeans 6.0.1 on Windows XP. It took a little longer than usual for me to find reports of this problem using Google, but when I did I found that it is a known problem.

Someone suggested changing the command line arguments to NetBeans to increase the size of the memory for the JVM, but that didn't work for me. Instead, I figured out how to load gems from the command line, and once I did that one time, I was able to use the gem manager in NetBeans.

So, in more detail: Originally I had installed NetBeans from a privileged account using all the default options. To get new gems, in a non-privileged account, I had to create two environment variables with the following values:
set JAVA_HOME=C:\Program Files\Java\jdk1.6.0_05
set JRUBY_BASE=C:\Program Files\NetBeans 6.0.1\ruby1\jruby-1.0.2
Your values may differ, particularly the version numbers. I wrote it here as you'd do it in the command prompt window, but I actually did it using the System control panel.

I opened a comment prompt window and did:
%JRUBY_BASE%\bin\gem install login_generator
After a couple of minutes, everything seemed to end normally. I did Tools->Ruby Gems from a running NetBeans instance and didn't get the desired results, so I restarted NetBeans and then Tools->Ruby Gems got me a list of gems, including login_generator as an installed gem.